Top 10 Qs You'd want to know
FAQ-ID:1019
Not sure what to do after registration? Take it easy, now we’ll show how to get your workplace up and running in 5 simple steps!
With the correct settings and user-defined rules, a virtual workplace in WorkDo can perform real-life routine practices and operations of your workplace. Here’s how!
Start WorkDo in 5 Steps
STEP 1 │ Create a Workplace
The first thing you should do after registration is to create a virtual workplace, then you can follow the next step and bring your teammates and collaborate on board.
View file:WorkDo Quick Start Settings
STEP 2 │ Invite Teammates to Your Workplace
In this step you could either ask your teammates to join your workplace or have the workplace admin send join invites.
- Trial run:We recommend you invite at least 1 to 3 people assigned with different roles into the workplace to help try out all the tools and features in the trial run.
- Adoption:Invite the rest of the your team into the workplace and deligate their roles accordingly by repearting Step 3 and 4.
How to invite people to a workplace?
Can I join the company workplace on my own?
View file:WorkDo Quick Start Settings
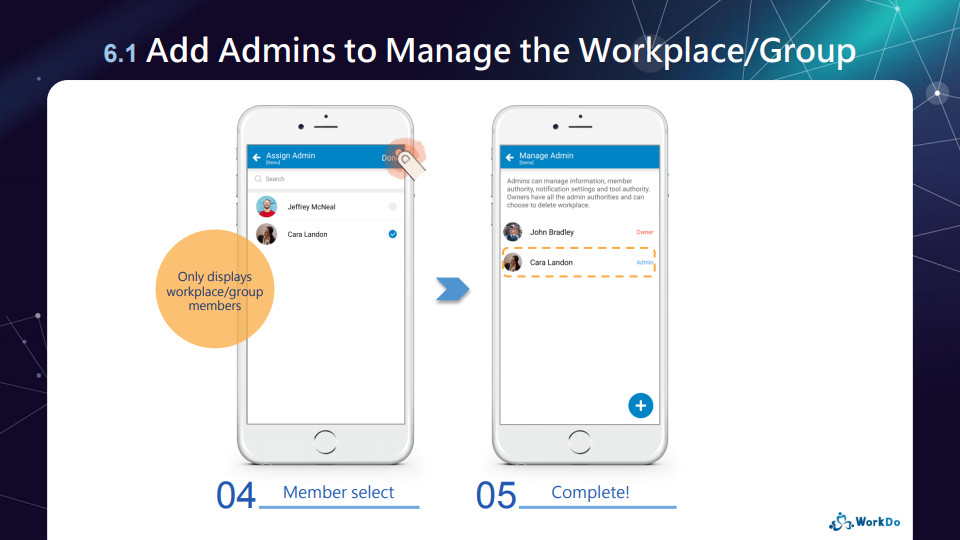
STEP 3 │ Set Workplace Admins
You are assigned as the workplace owner by default upon creating the workplace. The ownership can be transferred if need be, you should also assign other members, typically HR and/or IT staff, as admins to help manage the workplace and various settings.
How to add admins to workplaces or groups?
View file:WorkDo Quick Start Settings
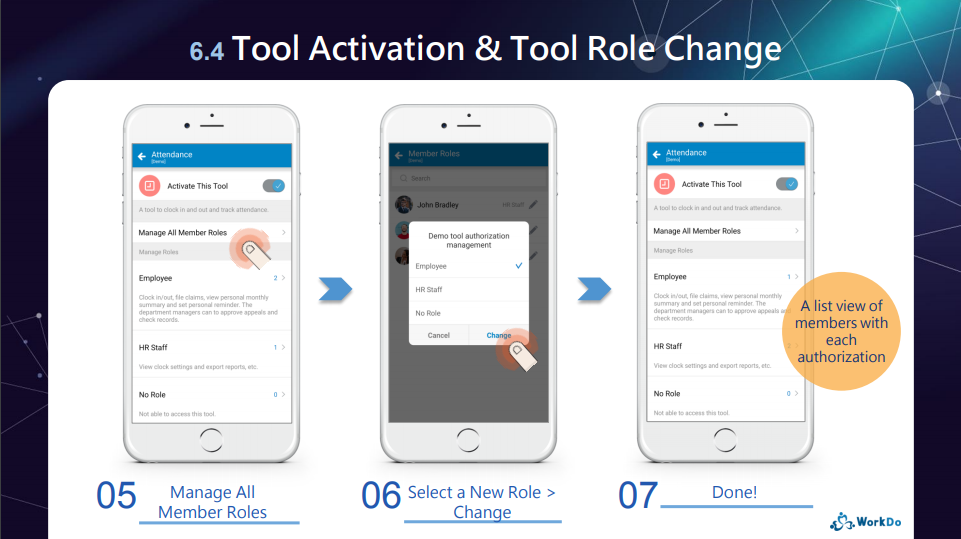
STEP 4 │ Set Tool Roles
Wanna enable payroll management, automated leave system, overtime calculation or Wi-Fi / GPS clock in / out? Whatever you need, they are in the tool box!
Just as a company has different people and managers to access different data and files, the tool roles in WorkDo ensure that members would use the tools and access the data with their permission for information compartmentalization.
How to activate / deactivate a tool?
Why do I have limited tool access?
View file:WorkDo Quick Start Settings
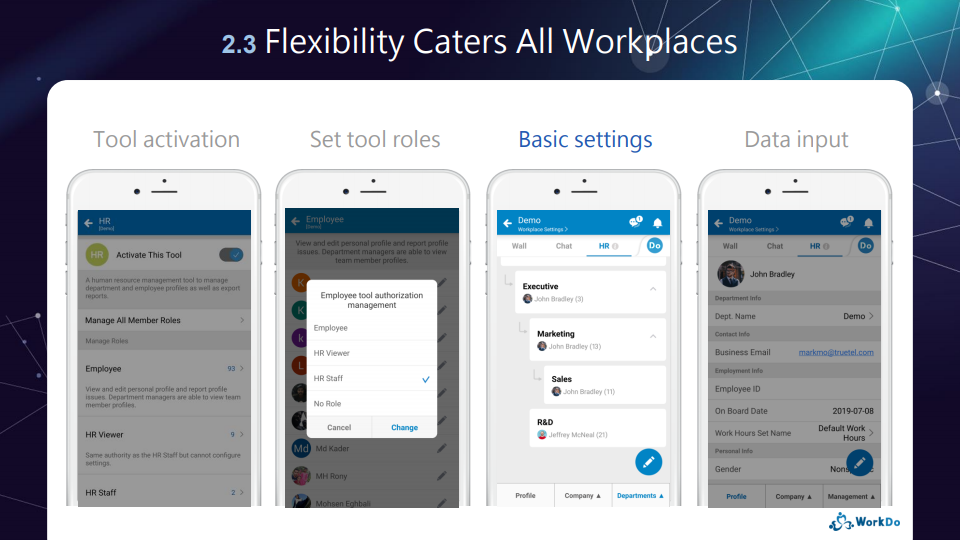
STEP 5 │ Customize Tool Settings
Taking into consideration that each workplace operates differently, the tools in WorkDo are just as flexible to cater to workplaces of various industries and team cultures. In this step, you will learn how to customize the tool settings that can best represent how your workplace truly operates.
View file:WorkDo Quick Start Advanced Tools
 Reminders
- Although listed as admins only, all users are able to create workplaces, i.e. Step 1, however, from Step 2 forward, are only the admins are allowed.
- By now, your workplace should be up and running, but if you need more detailed explanation, please use the guides below.
Download Quick Start Settings (Step 1 to 4) Download User Guides (Step 5)
Relevant Questions
What do different roles do in a workplace/group?
How do I sign up for WorkDo?
How to create a workplace?
Can I join the company workplace on my own?
How to invite people to a workplace?
How to add admins to workplace or groups?
What are tools?
How to activate / deactivate a tool?
Why do I have limited tool access?
What’s the difference between “Leave” and “Leave Pro”?
FAQ-ID:1038
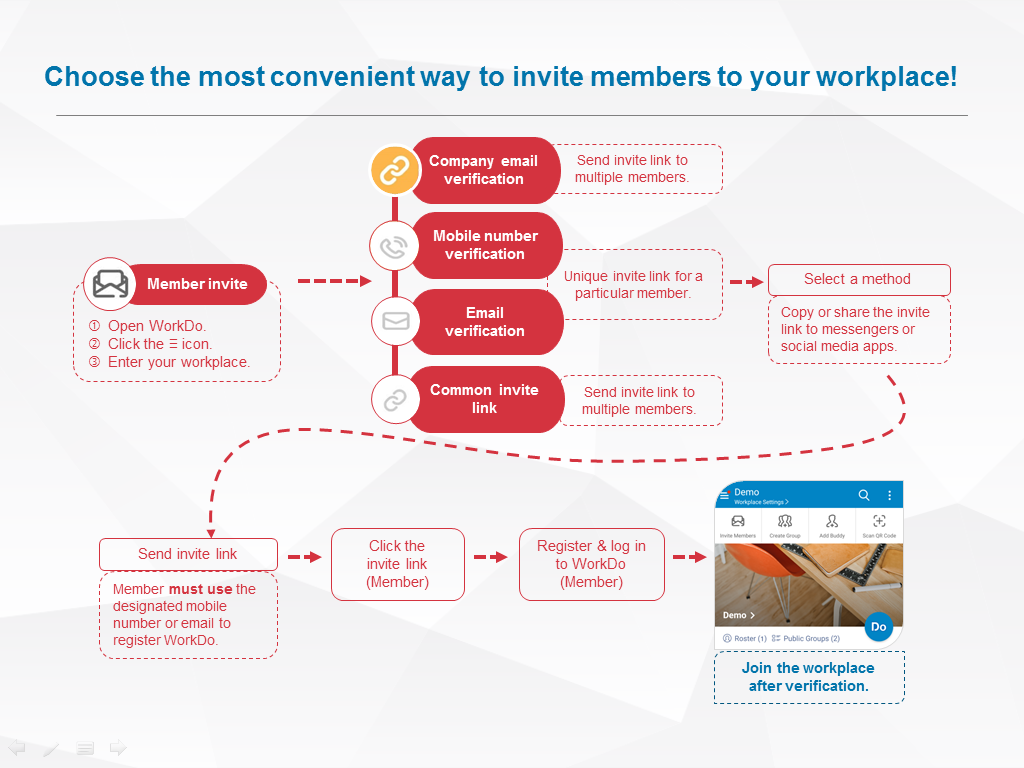
There are a number of ways team members could join a workplace and we’ll explain more here.
You could invite team members to the workplace if you are a workplace admin or the Workplace Privacy setting is set to everyone is allowed to invite other members to the workplace.
Invite New Members to a Workplace
Steps:
- On the workplace page.
- Click the Invite Members button on the upper-left corner of the screen.
- Select verification method.
- Verify with company email address.
- Verify by mobile number.
- Verify by email address.
- Verify via invite link, invite Network buddies or member search.
- Send invite link.
- App │ Send the invite link via Facebook, LINE, Whatsapp, WeChat, or copy and paste invite link to external apps.
- Web │ Copy and paste an uniquely generated invite link to other external software.
Reminder
In Step 3, depending on the verification method selected, WorkDo will generate unique invite links for the unregistered users, this in term, will affect whether the users have to be approved by the workplace admins upon joining the workplaces.
Next, we’ll go through the 3 primary ways for members to join workplaces.
- Self-join a Workplace
Download and register WorkDo and the user will be guided to the Join/Create Workplace screen. Click Join Workplace and fill in the personal company domain email address to join the workplace.
- Invite Members to a Workplace
WorkDo will generate invite links based on the verification method selected and the invitees have to use the specified email address or mobile number to register before joining the workplace.- Verify with Company Email Address:Send The invite link can be sent to all the users who are using the same company email domain and will automatically join the workplace upon signing on.
- Verify by mobile number:Target invite users with specified mobile numbers who don’t use company email addresses to the workplace.
- Verify by Email Address:Target invite users with specified mobile numbers who don’t use company email addresses to the workplace.
- Invite Link, Network Buddy or Search:This method is suitable for companies that don’t have a company email domain. The invite link generated can be sent to all users, however, the workplace admins have to manually approve each individual before joining the workplace.
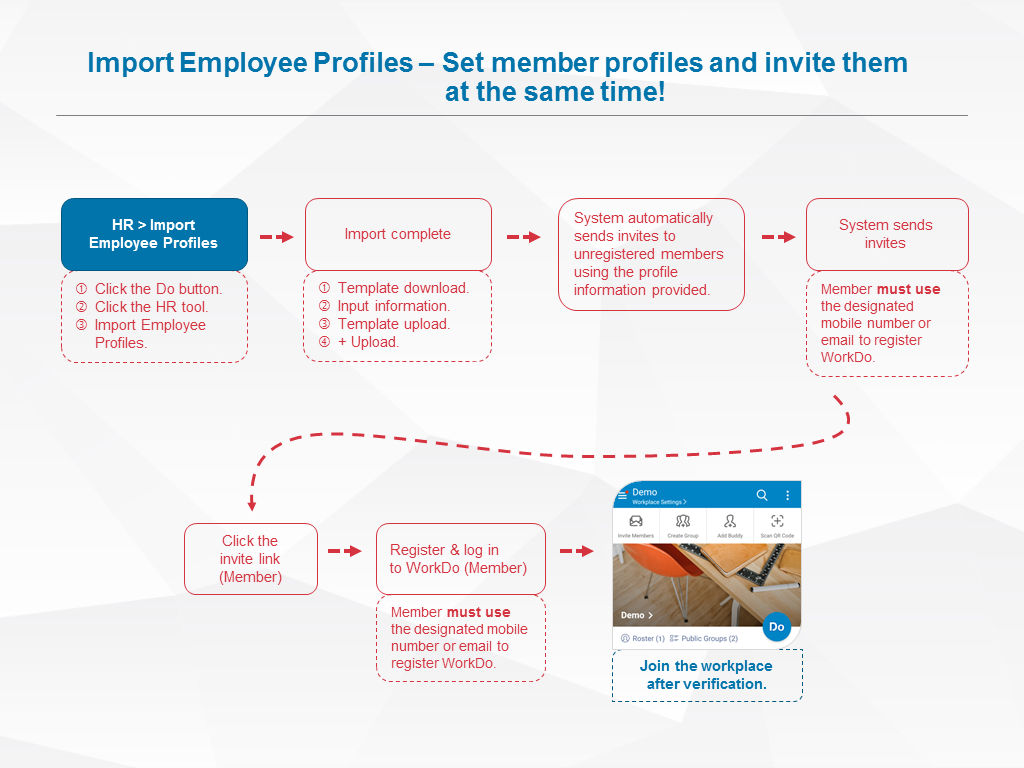
- Batch-import Employee Profiles
The workplace admins have to use the HR tool to batch-import employee profiles to WorkDo, in doing so, the system will send an invite link to everyone who has not signed on to WorkDo using either the email address or mobile number.
 Note!
Note!
- Please note that although the permission for member invite is marked for workplace members and admins, however, this is entirely dependent on the privacy settings of the workplace.
- When members are invited or join the workplace on their own, please use the HR tool to edit their employee profiles.
Relevant Questions
Set your workplace in 5 steps
Can I join the company workplace on my own?
What do I need to do for the new employees joining the workplace?
Get notifications when members join and leave.
Having problems importing employee profiles?
What to do when employees resign?
How do I sign up for WorkDo?
Can I interact with a member individually instead of with all members?
Can I bind the company email domain when I created the workplace using a free email domain?
Sign up/Log in
FAQ-ID:1019
Not sure what to do after registration? Take it easy, now we’ll show how to get your workplace up and running in 5 simple steps!
With the correct settings and user-defined rules, a virtual workplace in WorkDo can perform real-life routine practices and operations of your workplace. Here’s how!
Start WorkDo in 5 Steps
STEP 1 │ Create a Workplace
The first thing you should do after registration is to create a virtual workplace, then you can follow the next step and bring your teammates and collaborate on board.
View file:WorkDo Quick Start Settings
STEP 2 │ Invite Teammates to Your Workplace
In this step you could either ask your teammates to join your workplace or have the workplace admin send join invites.
- Trial run:We recommend you invite at least 1 to 3 people assigned with different roles into the workplace to help try out all the tools and features in the trial run.
- Adoption:Invite the rest of the your team into the workplace and deligate their roles accordingly by repearting Step 3 and 4.
How to invite people to a workplace?
Can I join the company workplace on my own?
View file:WorkDo Quick Start Settings
STEP 3 │ Set Workplace Admins
You are assigned as the workplace owner by default upon creating the workplace. The ownership can be transferred if need be, you should also assign other members, typically HR and/or IT staff, as admins to help manage the workplace and various settings.
How to add admins to workplaces or groups?
View file:WorkDo Quick Start Settings
STEP 4 │ Set Tool Roles
Wanna enable payroll management, automated leave system, overtime calculation or Wi-Fi / GPS clock in / out? Whatever you need, they are in the tool box!
Just as a company has different people and managers to access different data and files, the tool roles in WorkDo ensure that members would use the tools and access the data with their permission for information compartmentalization.
How to activate / deactivate a tool?
Why do I have limited tool access?
View file:WorkDo Quick Start Settings
STEP 5 │ Customize Tool Settings
Taking into consideration that each workplace operates differently, the tools in WorkDo are just as flexible to cater to workplaces of various industries and team cultures. In this step, you will learn how to customize the tool settings that can best represent how your workplace truly operates.
View file:WorkDo Quick Start Advanced Tools
Reminders
- Although listed as admins only, all users are able to create workplaces, i.e. Step 1, however, from Step 2 forward, are only the admins are allowed.
- By now, your workplace should be up and running, but if you need more detailed explanation, please use the guides below.
Download Quick Start Settings (Step 1 to 4) Download User Guides (Step 5)
Relevant Questions
What do different roles do in a workplace/group?
How do I sign up for WorkDo?
How to create a workplace?
Can I join the company workplace on my own?
How to invite people to a workplace?
How to add admins to workplace or groups?
What are tools?
How to activate / deactivate a tool?
Why do I have limited tool access?
What’s the difference between “Leave” and “Leave Pro”?
Account
FAQ-ID:1026
Every WorkDo user has a unique QR code upon sign up. Share your QR code with other users and they can quickly and easily add you as a buddy (friend) or add you into groups.
There are numerous ways to share user QR code depending on the situation or user preference. Users can also refresh and update thie QR code when needed.
Join groups or add buddies via QR code
Step:
- My QR Code
- App │ Click the
 icon on the upper-right-hand corner and select My QR Code.
 - Web │ Click the
 icon on the upper-right-hand corner and click App Settings and you can find My QR Code option on the side menu.
- App │ Click the
- Sharing Methods
- Display QR Code
Display your WorkDo QR code for other users to scan and add you as a buddy. Users can also add members via QR code in the group settings to add you into groups. - Save QR Code
Save the QR code to your device and share it with other users. The web version users can right-click the QR code and save it to your PC. - Copy Link
Acting the same as the QR code, you can share your link to other users to add you as a buddy. - Scan QR Code
Available to the app version only, use this option to scan other users’ QR codes to add them as buddies or add them into groups. - Refresh QR Code
A user QR code QR code will not expire, should situation arise that you no longer want your QR code to stay active, simply refresh your QR code to update it.
- Display QR Code
Reminders
- Other users will always add you as a buddy when clicking your link.
- Click Group Settings > Add Members > QR Code to scan user QR code or select a user QR code that is saved on your device to add this member into the group.
Main Settings
FAQ-ID:1131
Shouldn’t you give your new team members a warm welcome when they are on board?
And it’s important to know when team members leave so you can allocate your resources and prioritize team tasks.
Did you know there is a setting that sends notifications when members join and leave your team? Well, now is a good time to take advantage of it!
Set Workplace / Group Notifications
Steps:
- Enter the Workplace Settings.
- Scroll down to the Manage Workplace / Group section and select Workplace / Group Notifications.
- Turn on the notification settings.
- Alert When Members Join/Leave │ Turn this on to alert the owner and admins when members join or leave.
- Show Chat Message When Members Leave │
Turn this on to show a chat message in the chatroom when members leave.
Reminders
- Member join and leave messages do not count towards the badge count.
- The member join /leave notifications is shown in the personal notification certer of the owner and admins.
Relevant Questions
What is Chat Alert? And how do I change its settings?
How do I change the notification settings?
Notification delay.
Who is allowed to invite new members into workplaces or groups?
Can I set only admins are allowed to post at the workplace level?
Can I control members from creating public or private groups?
What do different roles do in a workplace or group?
Workplace
FAQ-ID:1035
A workplace is a place for you, your company and all your coworkers to communicate and collaborate together. The workplace is designed to be secure and safe for your company with multiple levels of privacy settings. You can also create groups within the company for different departments, projects, or topics.
Within a workplace, you can chat, create tasks, view events, upload files and even make a poll with your colleagues. Also, you can use the HR, Leave, Expense, Conf. Rm. and CRM tools to better manage your company.
The 7 benefits of having a workplace in WorkDo
-
All-in-One
WorkDo is a true all-in-one collaboration platform that integrates all to tools you need to communicate, collaborate and operate. WorkDo effectively reduces your company’s costs of having to maintain multiple servers and IT equipment on your own.
-
Secure Access Control
WorkDo only allows your colleagues to join your secure workplace. There are various ways that you could use to invite the right people to join your workplace, leave it to us to block out the unwanted individuals.
-
The Perfect Virtual Workplace
WorkDo is excellent if your workplace requires multiple discussion groups for different tasks, teams, purposes, etc. The abundant amount of tools guarantee that there’s always the right tool for the job!
-
Flexible Permissions
Each employee could have different permissions in WorkDo, and different tool permissions allow different employees to use the tools in different ways. Changing permissions is as easy as a few clicks by the workplace admins.
-
Report Export
WorkDo keeps track of all the data and records for you, may it be attendance, vacations, approvals and employee information. Download the report you need and customize it the way you want it, it’s all here!
-
Swiftly Remove Former Employees
When an employee part ways with the company, that person could no longer access the workplace data, and everything will be kept for reference, including files and chats.
-
Reduce IT Costs
No servers, no IT staff, no maintenance fees. We’ll handle the security, upgrade and maintenance, so you can focus reaching your goals, together!
Relevant Questions
How to create a workplace?
What should I do on the Start WorkDo page?
How to invite people to a workplace?
How do I edit the company information?
Can I join multiple workplaces with my account?
What are the two default groups for? How Do I use them?
Can I have sub-groups in my workplace? How to create a new group?
What do different roles do in a workplace/group?
What do different roles do in a workplace/group?
WorkDo Network notifications.
Pricing Plans
FAQ-ID:1036
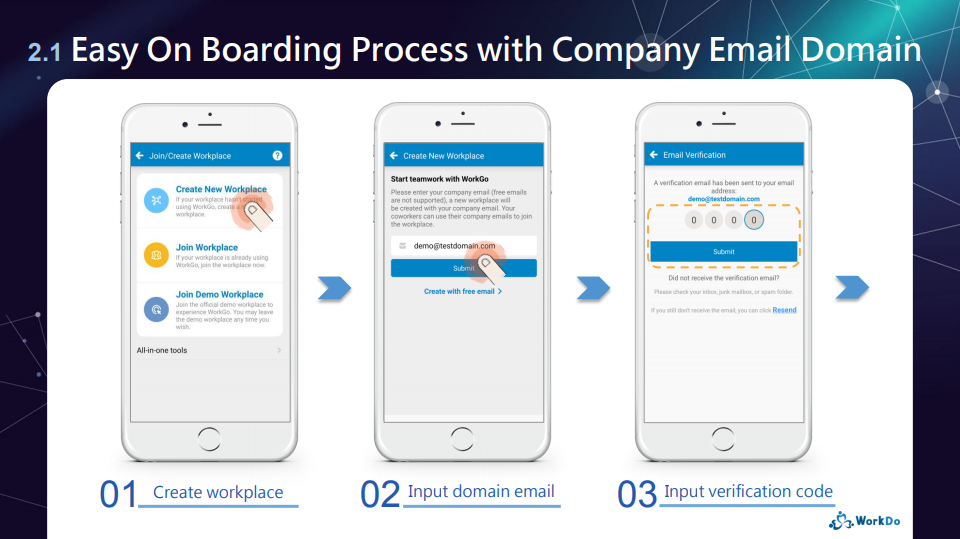
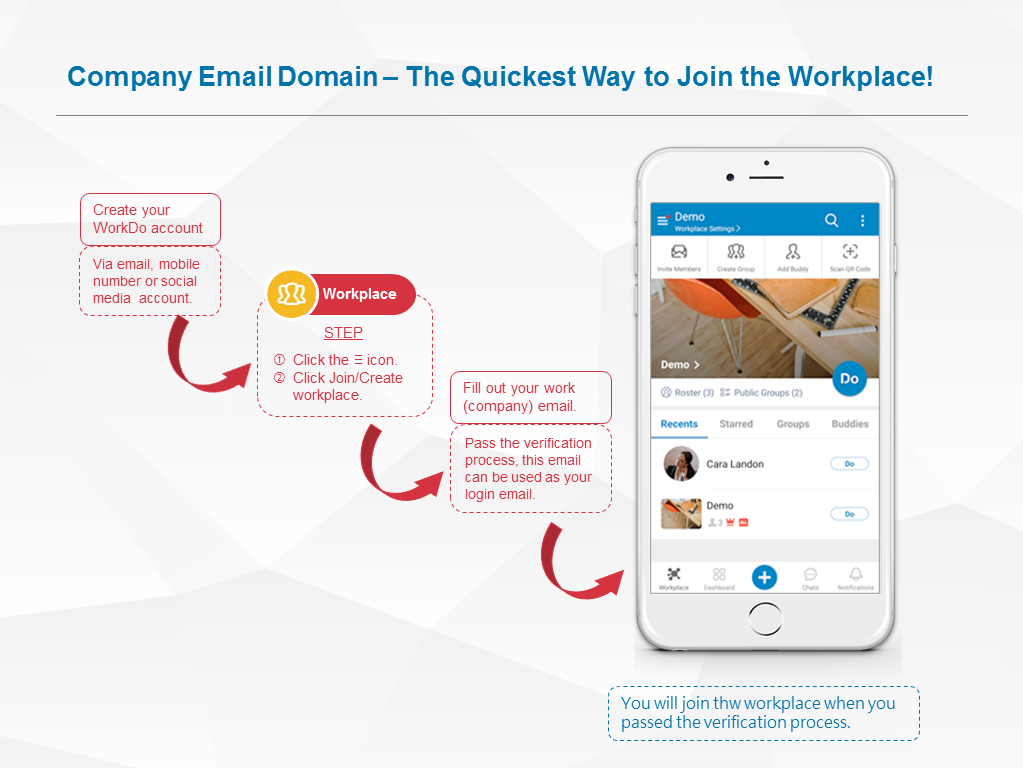
Creating a workplace in WorkDo is easy! All it requires is a valid email address for account verification purposes.
When creating a workplace, you are given the choice of either using a company email address or a free email address. The differences are explained below.
Plan:![]() All plans
All plans
Permission:![]() All users
All users
Interface:![]() App
App ![]() Web
Web
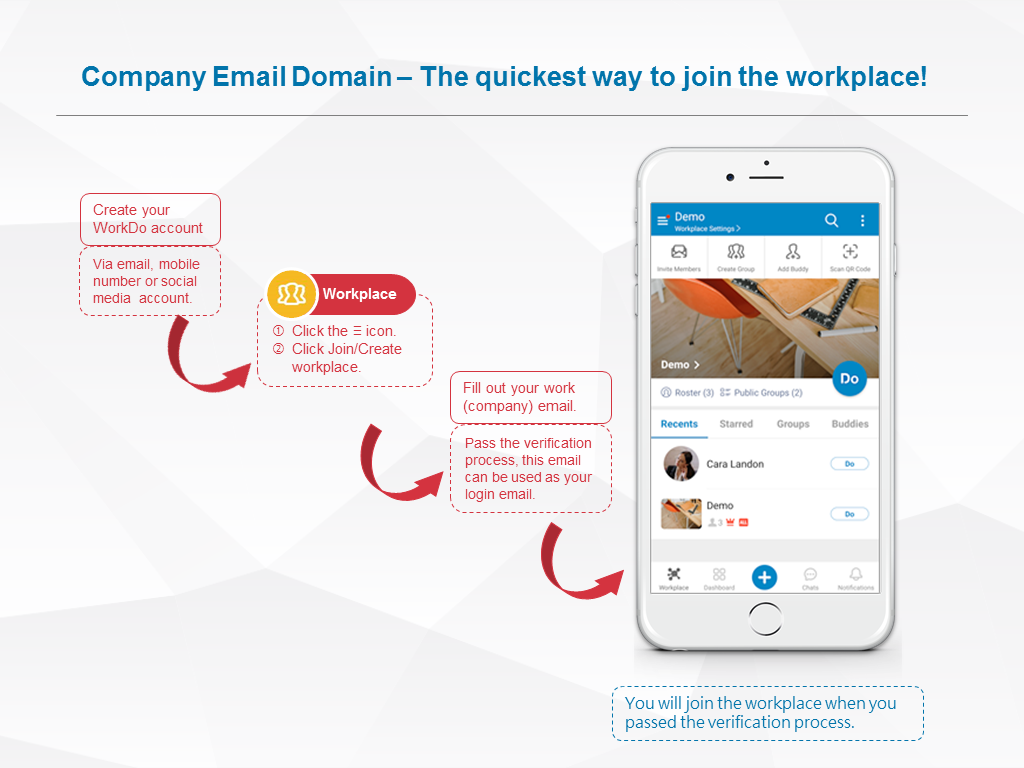
Company Email Address
Applicable: For teams that use company email addresses.
Pro: Employees that have the same company email addresses will be automatically invited to join the workplace instead of manually inviting, saving precious time.
Features
- A single company email domain can only be used to create one workplace and only members with the same company email domain will auto-join the workplace.
- Any company email address is unique and for one individual. Avoid mistaken identity!
- By following the steps in creating a workplace, the first person to use the company email address and complete the account verification will be assigned as the owner of the workplace (The ownership can be transferred to other members later on).
- The rest of the team members can auto-join the workplace using the company email.
Steps
- On the Join/Create Workplace page.
- Complete the workplace registration.
- Click the Menu button (
 ) and select Join/Create Workplace.
- Click Create New Workplace.
- Enter your company email address.
- Click Submit.
- Verification process
- If you used the company email for your personal account registration, please go to step 6.
- If you used an email address that is different from your company email address, please retrieve the verification code from your company email inbox and input it on the screen.
- Enter the company information On the workplace home screen to complete.
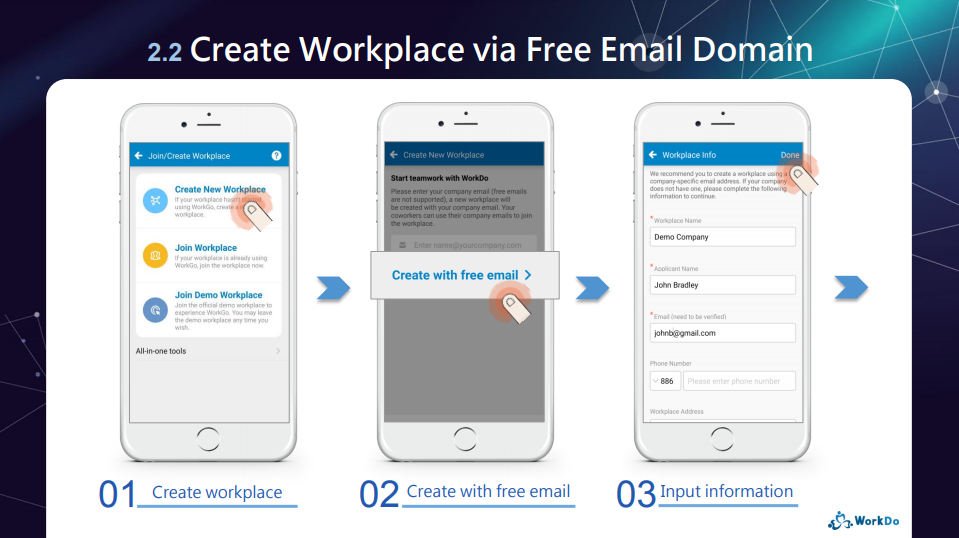
Free Email Address
Applicable: For teams that use free email addresses(@gmail, @yahoo…etc.)
Pro: Everyone has to be manually invited and verified first before joinning the workplace.
Features
- Unique email address, no mistake of identity!
- By following the steps in creating a workplace,you will be assigned as the owner of the workplace (The ownership can be transferred to other members later on).
- Target invite members to join the workplace, verification process is no longer required.
Steps
- On the Join/Create Workplace page.
- Complete the workplace registration and you will be led to the workplace home screen.
- Click the Menu button ( ) and select Join/Create Workplace.
- Click Create New Workplace
- Click Create with free email
- Fill out the necessary information
- Click Done
- The workplace home screen will be shown indicating the registration completion.
Reminders
- A company email domain is recognized by the company name followed by the @ sign in the email address (ex. johndoe@company.com). Most company email domains are paid services, however, there are exceptions that even Google’s @gmail.com is used as a company email domain. So please check with your IT staff before registration.
- If your company is a multinational conglomerate or has branch offices, you could simply use the same account and create a new workplace and manage multiple workplaces with the same account.
- If a former employee created a workplace using the company email that is no longer needed, please ask them to delete the workplace or contact us for assistance.
Relevant Questions
What is a workplace?
What should I do on the Start WorkDo page?
How to invite people to a workplace?
How do I edit the company information?
What do different roles do in a workplace/group?
Can I join multiple workplaces with my account?
Workplaces, groups, buddies? Use each level to your advantage.
What are WorkDo’s pricing and plans?
Monthly or yearly payment plan? What’s WorkDo’s billing policy?
Can I bind the company email domain when I created the workplace using a free email domain?
Can I delete a workplace? Can deleted workplace be recovered?
FAQ-ID:1038
There are a number of ways team members could join a workplace and we’ll explain more here.
You could invite team members to the workplace if you are a workplace admin or the Workplace Privacy setting is set to everyone is allowed to invite other members to the workplace.
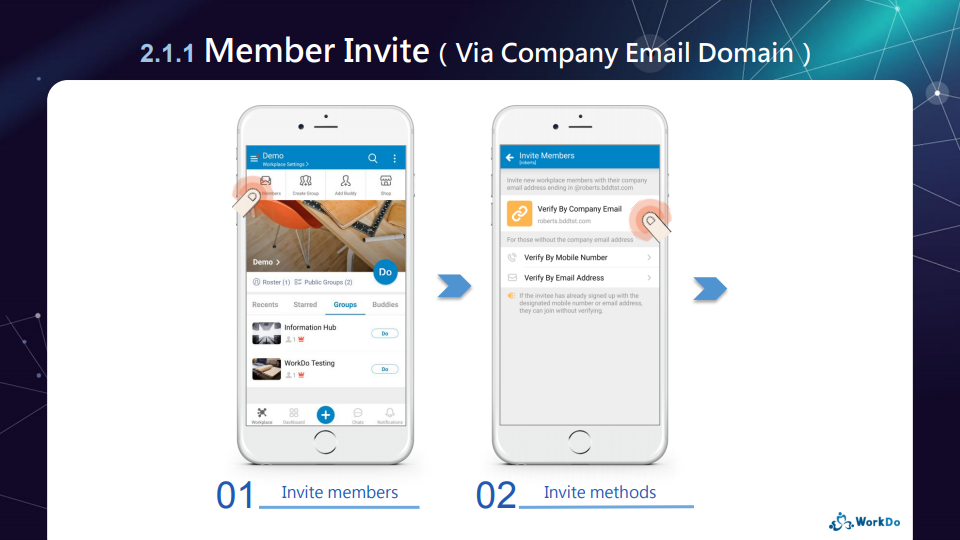
Invite New Members to a Workplace
Steps:
- On the workplace page.
- Click the Invite Members button on the upper-left corner of the screen.
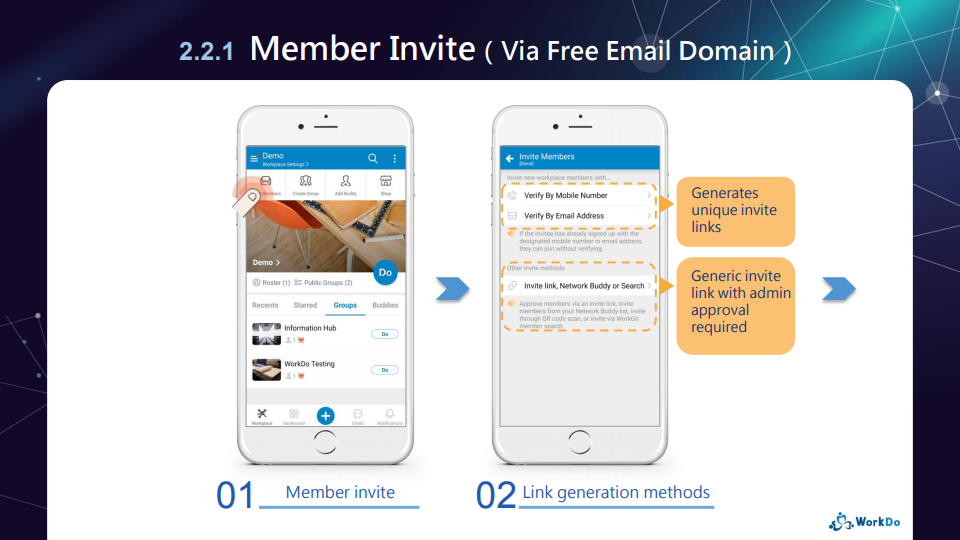
- Select verification method.
- Verify with company email address.
- Verify by mobile number.
- Verify by email address.
- Verify via invite link, invite Network buddies or member search.
- Send invite link.
- App │ Send the invite link via Facebook, LINE, Whatsapp, WeChat, or copy and paste invite link to external apps.
- Web │ Copy and paste an uniquely generated invite link to other external software.
Reminder
In Step 3, depending on the verification method selected, WorkDo will generate unique invite links for the unregistered users, this in term, will affect whether the users have to be approved by the workplace admins upon joining the workplaces.
Next, we’ll go through the 3 primary ways for members to join workplaces.
- Self-join a Workplace
Download and register WorkDo and the user will be guided to the Join/Create Workplace screen. Click Join Workplace and fill in the personal company domain email address to join the workplace.
- Invite Members to a Workplace
WorkDo will generate invite links based on the verification method selected and the invitees have to use the specified email address or mobile number to register before joining the workplace.- Verify with Company Email Address:Send The invite link can be sent to all the users who are using the same company email domain and will automatically join the workplace upon signing on.
- Verify by mobile number:Target invite users with specified mobile numbers who don’t use company email addresses to the workplace.
- Verify by Email Address:Target invite users with specified mobile numbers who don’t use company email addresses to the workplace.
- Invite Link, Network Buddy or Search:This method is suitable for companies that don’t have a company email domain. The invite link generated can be sent to all users, however, the workplace admins have to manually approve each individual before joining the workplace.
- Batch-import Employee Profiles
The workplace admins have to use the HR tool to batch-import employee profiles to WorkDo, in doing so, the system will send an invite link to everyone who has not signed on to WorkDo using either the email address or mobile number.
Note!
- Please note that although the permission for member invite is marked for workplace members and admins, however, this is entirely dependent on the privacy settings of the workplace.
- When members are invited or join the workplace on their own, please use the HR tool to edit their employee profiles.
Relevant Questions
Set your workplace in 5 steps
Can I join the company workplace on my own?
What do I need to do for the new employees joining the workplace?
Get notifications when members join and leave.
Having problems importing employee profiles?
What to do when employees resign?
How do I sign up for WorkDo?
Can I interact with a member individually instead of with all members?
Can I bind the company email domain when I created the workplace using a free email domain?
FAQ-ID:1040
Certainly. We understand that subsidiaries of global corporates and conglomerates collaborate on a different scale, so in WorkDo you could use one account to join different workplaces.
Simply put, once you register an account, you could create and join multiple workplaces, the workplace data and configuration are unique, independent and secure, perfect for operating remote teams!
- Create, Join Workplaces
You can create multiple workplaces and/or join other workplaces with different profiles, each workplace’s data is independent to reflect how your real-world workplace operates. - Collaboration in WorkDo Network
WorkDo Network is created for you to collaborate with people from other companies. You could collaborate and create groups just like you would in the regular workplace. - Private Space
The Private Space is for you to use any way you see fit. You could use it to save important notes, make a to-do list or create reminders, any way you want, and it’s entirely for you only!
Switching workplaces
Steps:
- Click the workplace menu on the upper-left corner and a list of workplaces you are in will be displayed.
- Click on desire the workplace to switch workplace domain.
Reminder
Your WorkDo account is your own, in the event that you no longer work for the former company, you may use your account to join the new company.
Relevant Question
WorkDo web general navigation.
WorkDo app general navigation.
How to create a workplace?
Can I join the company workplace on my own?
How to invite people to a workplace?
What is WorkDo Network?
WorkDo Network, Workplace, Private Space, what are they?
What is All Upcoming on the bottom of the workplace list?
Sending messages.
FAQ-ID:1037
There are three ways you can join your company workplace: being invited via a team member, being invited when the company HR imported the employee profiles, or join the workplace on your own.
If your workplace has bound a company email domain, then you may join the workplace with your company email.
│ Steps for employees join the workplace(Click to enlarge) │
Onboard Workplace – Employees
STEP 1 │ Upon WorkDo Account Sign Up
- Donwload WorkDo then sign up and you will be directed to the Join/Create Workplace screen.
- Click Join Workplace.
- Enter your company email.
- Email verification
- Unverified │ A verification code will send to this email address, submit the code to complete the email confirmation to join the workplace.
- Verified │ Joins the company workplace immediately.
STEP 2 │ Join Multiple Workplaces
- Click the icon on the upper-left-hand corner..
- Click Join/Create Workplace.
- Click Join Workplace.
- Enter your company email.
- Emailverification
- Unverified │ A verification code will send to this email address, submit the code to complete the email confirmation to join the workplace.
- Verified │ Joins the company workplace immediately.
Reminders
- If the workplace is created with free email domain or you do not have a company email, the workplace admin will need to send you an invite to join the workplace.
- An employee profile will be automatically created in the HR tool upon joining a workplace. Only by completing the rest of the settings in the employee profile will the employee be able to clock in/out, send overtime, approvals, expenses requests, apply for leaves, and receive pay slips, etc.
Groups
FAQ-ID:1049
Whether is team collaboration or group discussion, you need to be able to instantly bring the right people into the group to reduce the decision-making time and avoid the golden opportunity passing by.
WorkDo offers multiple ways to invite team members into the groups, including invites via QR code, from workplace roster, buddy list, or Do-ID, etc, just go with what works for you!
Plan:![]() All plans
All plans
Permission:![]() Group members
Group members ![]() Group admins
Group admins
Interface:![]() App
App ![]() Web
Web
Invite New Members into Groups via Group QR Code, Link
- Enter the Group Settings.
- Click Group QR Code.
- Select a sharing method.
- Display QR Code
Display the group QR code for members to scan and join the group. - Save QR Code
Download the QR code and share it however you wish. Right click then svae the file for the web version. - Copy Link
Share the group QR code as a link and share it as you would normally. - Refresh QR Code
The group QR code doesn’t expire, however, in certain situations, you might want to refresh it. Simply click the icon on the QR code screen and select Refresh to update the QR code.
- Display QR Code
Invite New Members into Groups via Add Members Method
- Enter the Group Settings.
- Click Add Members.
- Select an invite method.
- Workplace Roster │ Select members from the entire workplace roster.
- Groups │ Add members from your other groups into the current group.
- Buddies │ Select from your buddy list into the current group.
- Scan QR Code │ Scan a QR code to join the group.
This is an app-only function. Click the QR Code tab to turn on your QR code scanner and scan the QR code to join the group. - Search Do-ID │ Use the Do-ID to search a member to add to the group, and this method will work for members who have set their Do-IDs.
Click the Do-ID tab and input a member’s Do-ID to send a group invite.
 Reminder
- The workplace admins have the authority to decide whether members are allowed to create groups in the workplace.
- If the Add Members option is not available to you, it means that this group only allows admins to invite new members.
- The invitees must be members of the workplace.
- WorkDo is a collaboration focused application, therefore, adding new members into the groups doesn’t require their permission.
Relevant Questions
What is my WorkDo QR code used for?
Who is allowed to invite new members into workplaces or groups?
Get notifications when members join and leave.
Workplace or groups? How to create groups?
Why can’t I find a group?
Workplace, Group, Buddy Settings.
What do different roles do in a workplace or group?
FAQ-ID:1051
There are a few possible reasons why you can’t find groups to join, such as workplace is not allowed to create groups, all groups are private or you are blocked by the groups.
Unable to Find Groups Troubleshoot
STEP 1 │ View Public Groups
All groups with privacy set to public will you be able to find them in the public groups and join.
Learn how to find public groups here!
STEP 2 │ Workplace Does Not Allow Creating Groups
See if your workplace allows group creation.
STEP 3 │ Check if Groups are Private
If your workplace allows creating groups and you are unable to find groups to join, it’s most likely that they are set to private or there aren’t any. Should this happen, you will need to ask workplace admins or team members to verify.
- No groups have been created │ Please ask someone for verify.
- Groups are private
01. Ask the group admins to check the privacy settings │ Go to Group Settings > Group Privacy > See whether the group has been set to private.
02. Ask a group member or admin to invite you to the group.
STEP 4 │ Blocked by Group Admins
When a member has been blocked by the group they are also unable to find it unless the group admin unblock them using the Group Settings..
Buddies
FAQ-ID:1055
Although WorkDo encourages team collaboration and communication, there are still times when you need to engage in one-to-one conversations, this is when you need to add a buddy or two.
Toggle among workplaces, , buddies to make sure you are always informed on what’s happening!
Switch among Workplaces, Groups and Buddies
STEP │ App
- Switch Workplaces
- Level Select – Workplaces, groups, buddies.
- Workplace │ Click the Workplace Domain button on the upper-left-hand corner and select from your list of workplaces.
- Group │ Click the Groups tab on the workplace page and select from your list of groups in the workplace.
- Buddy │ Click the Buddies tab on the workplace page and select from you list of buddies in the workplace.
- You will be brought to the chatroom immediately.
- You can begin chatting or use the Do button on the upper-right-hand corner to use other collaboration tools.
STEP │ Web
- Switch workplaces with the Workplace icon.
- Click the phonebook icon
 .
. - Select a tab.
- Groups │ Select a group from the list.
- Buddies │ Select a buddy from the list.
- You will be brought to the chatroom immediately.
- You can begin chatting, use a collaboration tool from the tool listed above the chatroom or select one with the Do button.
Reminders
There are two ways to enter a level.
- Search the chat history and enter from the chatroom.
- Select a post from the Dashboard Wall.